// Null

const a = null;

console.log(a, typeof a);

// Undefined
let b;

console.log(b, typeof b);

b = undefined;

console.log(b);

//null과 undefined는 비교하면 같다고 나옴
if(a == b){
    console.log(a == b);
}

//===으로 비교하면 타입까지 비교함 false라서 if문 실행 안됨
if(a === b){
    console.log(a === b);
}
→결과
// Number

const a = 37;

console.log(a, typeof a);

const b = 96.7;

console.log(b, typeof b);

const c = NaN; // NaN은 숫자가 아닌 Number형이라는 말이다.

console.log(c, typeof c);

const d = Number('Mark');

console.log(d, typeof d);

const e = Number('37');

console.log(e, typeof e);
→결과
// String

const a = 'Mark';

console.log(a, typeof a);

const b = "Mark" + ' Lee';

const c = a + ' Lee';

console.log(c, typeof c);

const d = `$ Lee`;//백틱

console.log(d, typeof d);
→결과
const a = Symbol();
const b = Symbol(37);
const c = Symbol('Mark');
const d = Symbol('Mark');

console.log(a, typeof a);
console.log(c === d); //같은 인자를 넣어도 다른 심볼로 인식됨. 심볼은 고유한 것이다.

new Symbol();// 심볼은 생성자로 만들어 질수가 없다
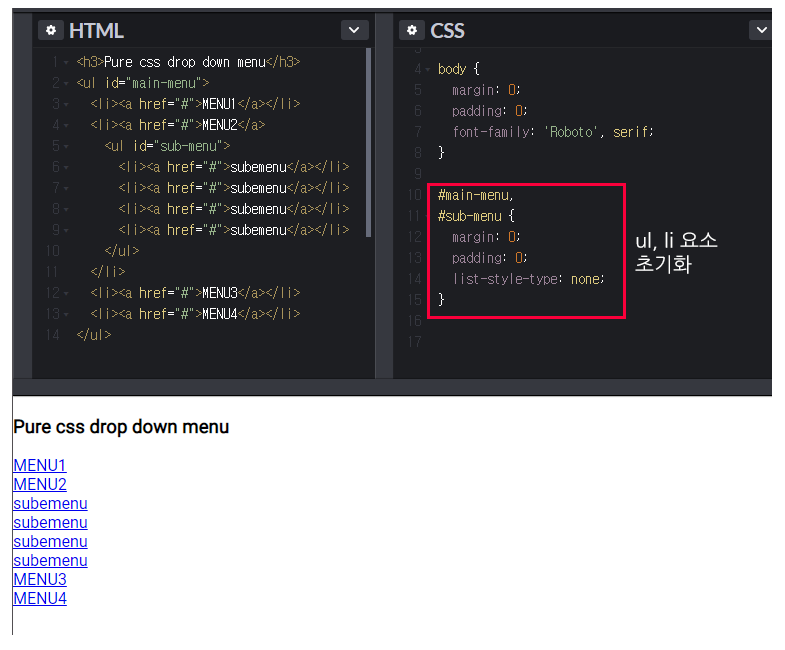
HTML요소에 접근하기 위해서는 document.getElementById(id)를 사용해야된다
id는 HTML의 요소를 의미하고 innerHTML은 HTML의 내용을 정의한다.
예시 코드
<!DOCTYPE html>
<html>
<body>

<h2>My First Web Page</h2>
<p>My First Paragraph.</p>

<p id="demo"></p>

<script>
document.getElementById("demo").innerHTML = 5 + 6;
</script>

</body>
</html>
결과
* document.write() 사용
예시 코드
<!DOCTYPE html>
<html>
<body>

<h2>My First Web Page</h2>
<p>My first paragraph.</p>

<p>Never call document.write after the document has finished loading.
It will overwrite the whole document.</p>

<script>
document.write(5 + 6);
</script>

</body>
</html>
결과
*유의할점!
document.write는 페이지가 다 로딩 된후에 사용하게 되면 페이지에 있는 html이 다 지워지게 된다.
예시 코드
<!DOCTYPE html>
<html>
<body>

<h2>My First Web Page</h2>
<p>My first paragraph.</p>

<button type="button" onclick="document.write(5 + 6)">Try it</button>

</body>
</html>
결과 화면
document.write()를 호출하기전document.write()를 호출하고 난 후
* window.alert() 사용
window.alert()를 사용하게 되면 경고창을 띄우게 된다
예시코드
<!DOCTYPE html>
<html>
<body>

<h2>My First Web Page</h2>
<p>My first paragraph.</p>

<script>
window.alert(5 + 6);
</script>

</body>
</html>
결과 화면
* console.log() 사용
예시코드
<!DOCTYPE html>
<html>
<body>

<h2>Activate Debugging</h2>

<p>F12 on your keybord will activate debugging.</p>
<p>Then select "Console" in the debugger menu.</p>
<p>Then click Run again.</p>

<script>
console.log(5 + 6);
</script>

</body>
</html>
<button type="button" onclick="myFunction()">Try it</button> 이부분에서 버튼을 클릭하면 myFunction()을 호출해주고 이걸로 인해서 <head>안에존재하는 myFunction이 실행되서 demo라는 아이디를 가지고있는 태그안의 내용이 변하게 된다.
<!DOCTYPE html>
<html>
<body>

<h2>What Can JavaScript Do?</h2>

<p id="demo">JavaScript can change HTML content.</p>

<button type="button" onclick='document.getElementById("demo").innerHTML = "Hello JavaScript!"'>Click Me!
</button>

</body>
</html>
실행 전 모습
실행 후 모습
위의 코드에서 보았듯이 <p>태그의 id가 demo인걸 알수있고 버튼을 클릭하면 onclick='document.getElementById("demo").innerHTML = "Hello JavaScript!"' 이부분에 의해서 p태그 안의 내용이 바뀌는걸 알수 있다.
텍스트 뿐만 아니라 이미지 태그도 적용가능하다
코드
<!DOCTYPE html>
<html>
<body>

<h2>What Can JavaScript Do?</h2>

<p>JavaScript can change HTML attribute values.</p>

<p>In this case JavaScript changes the value of the src (source) attribute of an image.</p>

<button onclick="document.getElementById('myImage').src='pic_bulbon.gif'">Turn on the light</button>

<img id="myImage" src="pic_bulboff.gif" style="width:100px">

<button onclick="document.getElementById('myImage').src='pic_bulboff.gif'">
	Turn off the light
</button>

</body>
</html>
		  // 이런류의 url사이트 처리, 시작하기전에 미리 준비 1순위로
@WebServlet(urlPatterns = "*.do", loadOnStartup = 1)
public class FrontController extends HttpServlet {

	public void init(ServletConfig config) throws ServletException {
		System.out.println("init() 호출됨");

		// application 객체 가져와서 필요한 데이터 저장
		ServletContext application = config.getServletContext();
		application.setAttribute("aa", "안녕");
		String hello = (String) application.getAttribute("aa");
	}

	protected void doGet(HttpServletRequest request, HttpServletResponse response) throws ServletException, IOException {
		System.out.println("doGet() 호출됨");

		// 요청 주소
		// http://localhost:80/funweb-model2/index.do
		//					  > 이 이후 부분이 URI, 실제웹서비스를하면 유일한 주소여야함
		//						위치를 나타내는 것이 아니라 식별하는 부분, 통상적으로 URL이라고 얘기를 하지만 정확하게는 URI
		// http://localhost:80/index.do

		/* 1단계) 명령어 command 구하기 */
		// URI 주소 가져오기
		String requestURI = request.getRequestURI();
		System.out.println("URI 주소: " + requestURI);
			// URI 주소: /funweb-model2/index.do

		// 프로젝트 이름 경로 가져오기
		String contextPath = request.getContextPath(); // 없으면 빈문자열 "" 들어옴
		System.out.println("contextPath: " + contextPath);
			// contextPath: /funweb-model2

		// 요청 명령어 구하기
		String command = requestURI.substring(contextPath.length());
			// command: /index.do
		command = command.substring(0, command.indexOf(".do"));
		System.out.println("command: " + command);
			// command: /index


		/* 2단계) 명령어 실행하기 */ // << 요눔을 우리가 코딩(키맵)
		// 이런식(if else)로하면 필요없는코드도 다 노출되어서 좋은게 아님
		Controller controller = null;
		ControllerFactory factory = ControllerFactory.getInstance(); // new! 객체생성은 동시접속자를 고려해야함 -> 중요한 싱글톤
		String strView = null;								 // 한번 뉴로등록한 컨트롤러객체는 자체가 싱글톤이라 걍 꺼내쓰면됨
															 // 그치만 컨트롤러팩토리는 아니니가 싱글톤 해줘야겠지
		// 명령어에 해당하는 컨트롤러 객체 구하기
		controller = factory.getController(command);
		if (controller  == null) {
			System.out.println(command + "를 처리하는 컨트롤러가 없습니다.");
			return; // return이니까 여까지하구 서버끝남
		}

		try {
			// 키맵에서의 new 어쩌구Controller에 해당하는 컨트롤러 객체 실행하기
			strView = controller.execute(request, response);
		} catch (Exception e) {
			e.printStackTrace();
		}


		/* 3단계) 화면응답(jsp실행) 또는 리다이렉트(.do) 이동 */
		if (strView == null) {
			System.out.println("이동할 화면정보(View)가 없습니다.");
			return;
		}

		if (strView.startsWith("redirect:")) { // .do로 끝나는 경로
			String redirectPath = strView.substring("redirect:".length());
			response.sendRedirect(redirectPath);
								// index.do?
		} else {										// index.jsp?
			String jspPath = "/WEB-INF/views/" + strView + ".jsp";
			RequestDispatcher dispatcher = request.getRequestDispatcher(jspPath);
			dispatcher.forward(request, response); // 해당 jsp 바로 실행하기 ( 갔다오는 리다이렉트랑은 다름 )
		}


	} // doGet
2.ControllerFactory.java
//컨트롤러마다 생성자를 프라이빗으로 감추고 세터게터하기 좀 에바니까 싱글톤으로 관리함
public class ControllerFactory {
	/* 싱글톤, 스프링가면 애노테이션 한개로 해결가능 */
	private static ControllerFactory instance = new ControllerFactory();

	public static ControllerFactory getInstance() {
		return instance;
	}
	//////////////////////////////////////////////////////////// 맵을 한개 선언
	private Map<String, Controller> map = new HashMap<>();

	private ControllerFactory() {
		// 키값은 .do로 끝나는 요청 URL주소의 일부 - 명령어

		// 명령어와 명령어를 처리하는 컨트롤러 객체를 쌍으로 등록
		// 사용자로부터 "" 이러한 요청이오면 new ~ 가 실행된다!
		map.put("/index", new IndexController());

		// user
		map.put("/userJoin", new UserJoinController());
		map.put("/joinIdDupCheck", new JoinIdDupCheckController());
		map.put("/userJoinPro", new UserJoinProController());
		map.put("/userLogin", new UserLoginController());
		map.put("/userLoginPro", new UserLoginProController());
		map.put("/userLogout", new UserLogoutController());
		map.put("/MyPage", new MyPageController());
		map.put("/UserUpdate", new UserUpdateController());
		map.put("/UserUpdatePro", new UserUpdateProController());
		map.put("/UserDelete", new UserDeleteController());
        	} // 생성자

	public Controller getController(String command) {
		// Map 컬렉션: 키값없는, 존재하지않는 값을 꺼내면 null을 리턴함
		Controller controller = map.get(command);
		return controller;
	}
}